Last week I was approached by a friend and collaborator to prepare some large volume renderings using the software volume renderer in yt. In the past we’ve successfully made very, very large image renderings using yt – Sam’s even made one at 8192^2, although at extremely high resolution like that sometimes the lack of fidelity in the underlying volume renderer shows up; sometimes even artifacts in the AMR grid boundaries, but that’s less common. Making the very large volume renderings isn’t too bad – it scales roughly with the number of pixels, but we can dispatch many frames to be rendered at once on a cluster. There are a couple other, more important things to consider when making the big volume renderings. For starters, the entire structure of volume rendering in yt was not really created to generate a series of images – only a single image. The idea was that you would prepare a specific image, make it, and move on. However, for this project, I want to do a zoomin, or possibly a more complicated camera path.
Additionally, one of the first things that we did with the volume rendering was silly: we applied no normalization to the output images. That was a mistake, I see now. Part of the reason for this was uncertainty in the correct normalization – the bias that the user wanted to apply may not be the natural bias from the image. But more than that, because the rendering algorithm itself was some what holistically settled upon (the original implementation, which we used for shell-style renderings, was not a “correct” implementation of alpha blending) a natural mechanism for scaling did not immediately present itself. One likely exists, possibly dependent on the field of view, I simply do not yet know it. This will have to be rectified, because the mechanism used for scaling a set of images will have to be different than the mechanism for scaling an image in isolation, or else frames will jump in brightness during the movie’s course.
The final thing that I wanted to change was to add support for stereo rendering. Rather than repeat any of the amazing discussion from Paul Bourke’s website, I’ll simply direct you there. Everything you ever wanted to know about stereo rendering. (When I was a first year grad student, we actually bought a copy of his site to use locally – it was our way of showing support for him putting it online, and it also came with a bunch of source code for example applications.) I first attempted to apply the correct method for stereo, where the view direction is parallel and the total view frustum is shifted.
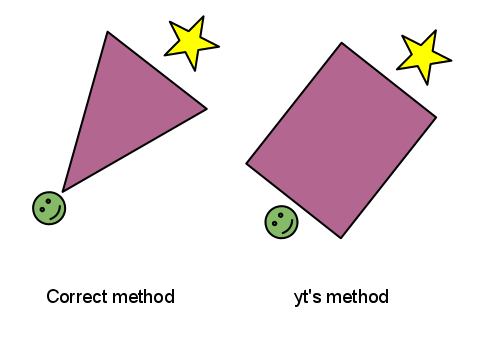
This did not work. In fact, it made me realize that all this time, the yt method for volume rendering is in fact … not really a volume rendering method inasmuch as it is a planar ray-casting method. Typically when doing volume rendering, there’s a perspective applied to the image: the rays all emanate from a single place, creating a frustum. But for yt, we actually set up a single plane of vectors at the back of the volume and advance that forward across the image. This is good and bad; it’s good in the sense that it’s more clear precisely what is going on. But it’s bad in the sense that correct stereo is more difficult. (Of course, on Bourke’s page he has a workaround that may work for this, but I have not yet attempted it.) Here’s a rough depiction of the different between the two methods.
The upshot is that stereo doesn’t seem to work unless you go with the “toe-in” method that can cause eyestrain after a long time and shows visible parallax at the edges. I’m not sure if this is going to be a problem, but because I am not right now eager to rewrite the rendering backend, this is the way it is for the moment.
To set up the stereo rendering, I separated out the rendering mechanism from the objects to be rendered. Previously, there was a single VolumeRendering object that you could create, raycast through, then discard. I created a new camera object that accepted a homogenized volume and would call “traverse” on that volume, feeding a back and a front point. The Volume is then responsible for passing off fixed-resolution grids to the camera, which accumulates an image buffer by calling the ray traversal functions. The front and back points are essentially the only thing needed to know this order, but the camera also stores its three orientation vectors and its position that describe it in 3D space. By separating out these two conceptual objects, we undo some of the “single, carefully constructed image” bias that was in the original volume renderer. (And, we open ourselves up to being able to use the Camera with a hardware volume renderer, should that day ever come.)
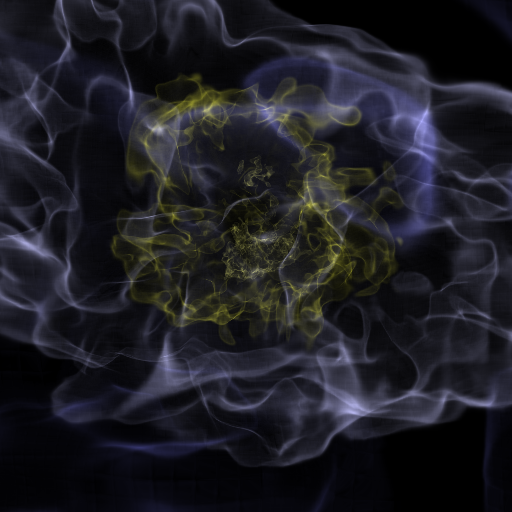
So now we have a camera, and it makes images like this:

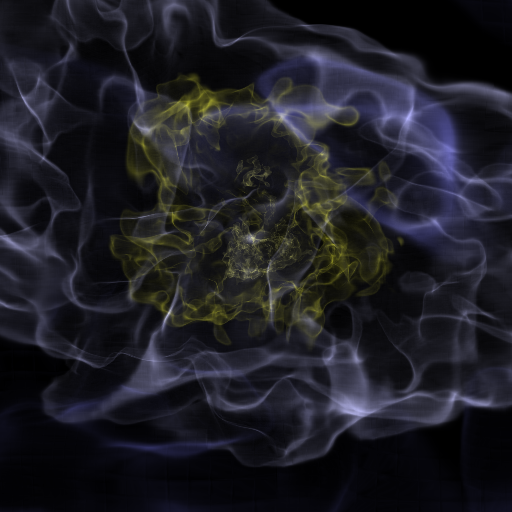
It’s a little dim, but that’s a task for another day. The next step is taking that perspective and turning it into a set of stereo images. To do that, I added a new class called StereoPairCamera. It accepts a Camera object and turns it into two camera objects, where the final interocular distance is calculated relative to the image plane width. As I mentioned above, this only operates via toe-in stereo, so it does this in the simplest manner possible: it moves each of the Left and Right cameras by half of the interocular distance away from the original location, and then recalculates a normal vector to point back at the original center. Now we can generate left and right images: Unfortunately, on my laptop (which is my primary/exclusive work computer) I don’t have the ability to view these pairs. To get around that, I wrote a simple stereo pair image viewer in OpenGL and imposed upon my friends that do have a stereo viz wall to test it out – and after some fiddling with the interocular distance, we got what appeared to be workable stereo pairs.
The full code for generating camera paths as well as stereo pairs is already in yt, but the documentation is still being written; I might also clean up the interface a bit. Additionally, at some point in the future, the issue of toe-in stereo versus correct parallel-frustum stereo will need to be dealt with; the last thing I really want to do is force people to only use a bad method for generating stereo pairs. Hopefully that is something that can be dealt with at a later time.
Thanks to the wealth of resources out there for making this a relatively easy task: the aforementioned Paul Bourke website on stereo pairs, the PyOpenGL and PIL teams for making the image pair viewer easy, and everyone else whose work I’ve built on to make things like this.